
This post may contain affiliate links. As an Amazon Associate I earn from qualifying purchases.
These homemade shea butter and tallow shampoo bars are the perfect beginner friendly soap bar to make. It requires only six ingredients and no immersion blender necessary for this recipe! Trust me, you don’t want to use your immersion blender to mix up this soap batter.
So, grab your heat proof glass and stainless steel bowls. Don your gloves and safety goggles and lets make some natural, hair and skin loving shampoo bars 😀
If you’ve never made homemade bar soaps before check out this post on how to safely make your own cold process soap bars.
What you’ll need to make homemade shampoo bars
Transitioning from store bought soaps and detergents into natural, homemade options can be daunting. It’s certainly more convenient to continue using the store bought things, or even buy natural alternatives. But… those are expensive and learning a new skill will take time.
The good news is that these homemade shea butter and tallow shampoo bars are perfect for beginner soap makers and very cost effective. If you buy your oils and fats in bulk each 4-5oz bar will only cost about $1.06.
Of course the cost depends on how much material you buy at once. Buying in bulk is going to bring down your price per ounce. Also, if you’d like to add essential oils to the mix, that will increase the overall cost.
Even still, these bars last a long time. You’ll get more than enough washes to repay any cost in production. Plus, if you are wanting to reduce waste these are amazing for a zero waste, plastic free, shower routine.
Homemade shampoo bars: Step 1
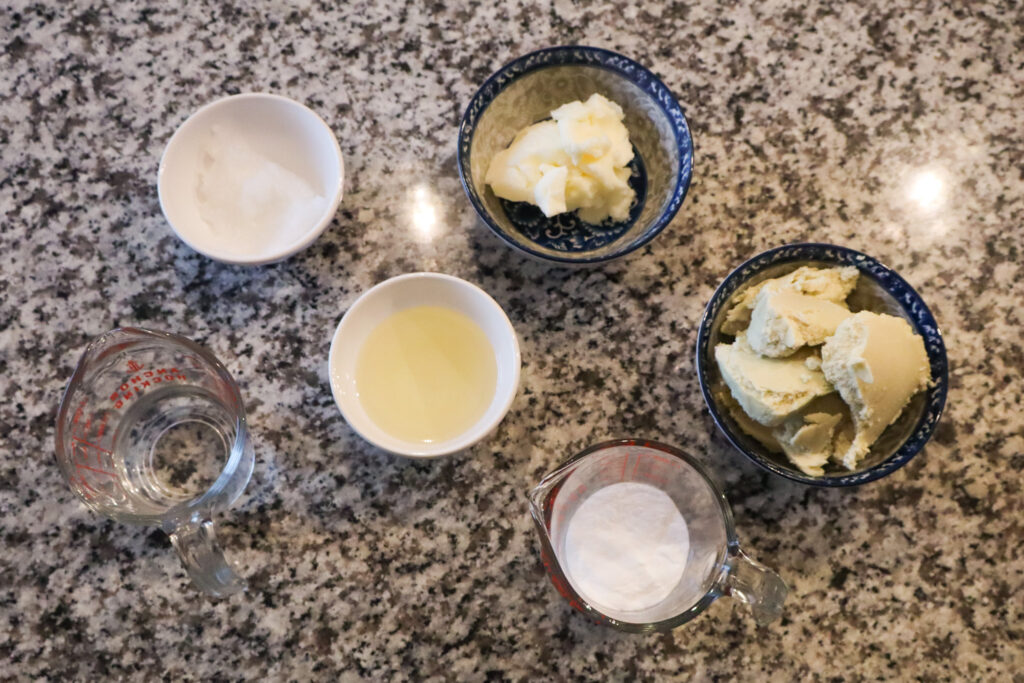
First off, we need to weigh out all of our ingredients. This recipe is enough to fill a 42oz loaf mold, but if you’re willing to do some math, you can adjust the recipe to fill any mold you have on hand. (Only adjust the recipe if you know how to use a lye calculator and have plenty of soap making knowledge and experience.) Otherwise, you can still make this soap even if you have a little leftover or need to get creative with alternative molds.
Because this recipe uses a lot of saturated fats, we will be using a high water to lye ratio. A 28% lye concentration. This allows us more time to work with the soap batter before it becomes way too thick to pour nicely. But don’t worry! This soap bar will harden quickly and is ready to unmold and cut 12-24 hours after molding.
Water
I will be using distilled water since we have hard water from the tap. If you have a source of soft water from a spring or clean, filtered rain water, you can use that in place of distilled. You can still use hard water in your soap making but it may affect your soaps shelf life.
For this recipe we will need 295g or 10.42 oz of water.
Lye
For this shampoo bar we will be leaving behind a 2% superfat. In other words, 2% of the total fat will not turn into soap. I wanted to keep this low since the idea of greasing up my hair doesn’t really sound appealing to me. The fats and oils in this recipe are put together in a way to be gently cleansing while still high in conditioning and moisturizing.
Total lye needed, 114g or 4.05 oz
Shea butter
Shea butter is a powerhouse for the hair and skin. It makes up half the oils/fats in this recipe and leaves it’s distinct smell in the finished product. My husband says the soap smells like unscented Dove, and he has a very sensitive sniffer. Use unrefined, raw shea butter for this recipe.
You’ll need 439g or 15.5oz.
Tallow
Tallow is certainly making a come back in recent years as a wholesome, natural ingredient for use in our kitchens and bathrooms. It is so gentle on the skin and hair and might even aid in reducing hair loss! I don’t know about you, but pre and postnatal hair loss can take a toll.
We will be using 176g or 6.2oz.
Castor oil
This is another famous oil for hair and skin care. It’s gentle on the skin and hair and helps impart a lovely lather to your soap. It’s also the most common source of ricinoleic acid for DIY soap.
You’ll need 161g or 4.65oz
Coconut oil
Another great oil for the hair and skin. In soap, coconut oil is used for its high lauric acid content. This is a highly cleansing fatty acid that in high amounts will actually dry out your skin and hair. However, in combination with other oils it creates a soap with a beautiful lather without being too harsh.
For this recipe you’ll need 162g or 4.65oz
How to make shea butter and tallow shampoo bars
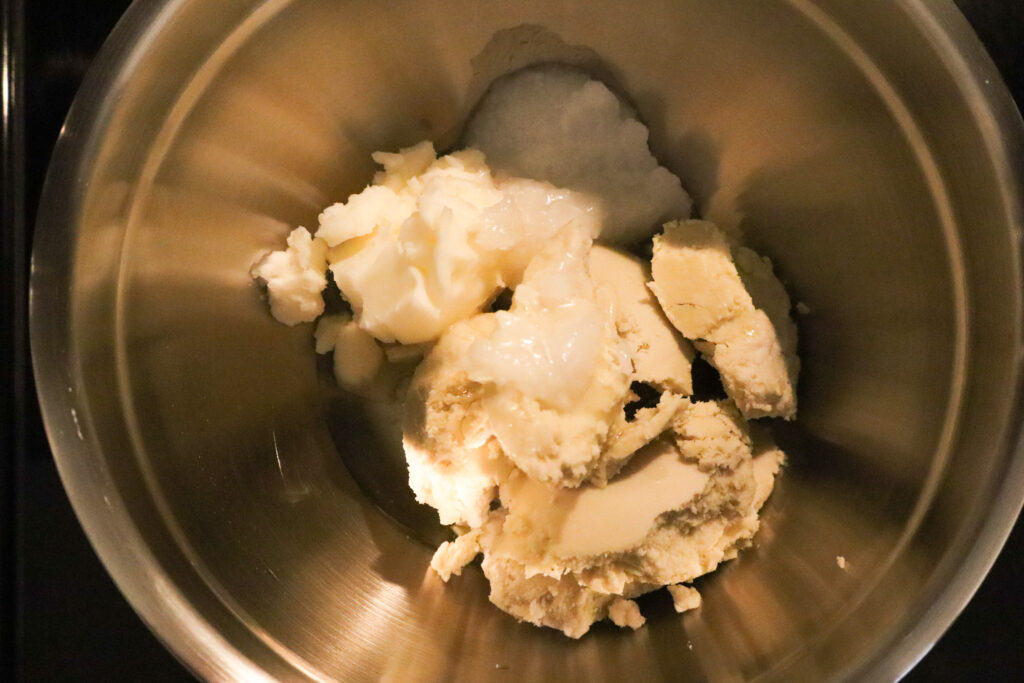

Now that you’ve measured everything out it’s time to melt the fats and make your lye solution. I prefer to weigh out all of my fats first and then weigh out the water and lye last. This allows me to immediately make my lye solution instead of measuring out the lye and letting it sit exposed to the humid air for several minutes.
Set your oils either in a double boiler or in a stainless steel bowl or pot and heat low and slow. If heated too fast, the shea butter will turn grainy and result in an unintentionally exfoliating soap bar. Break apart larger chunks of fat and stir gently every few minutes or so until no solid fat remains.
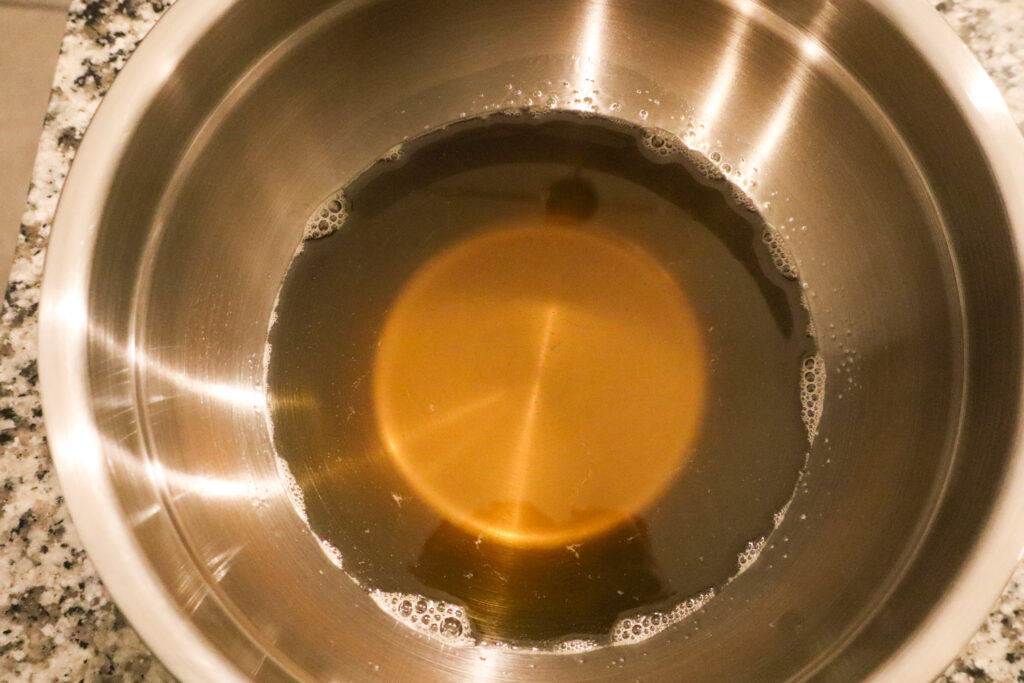
By the time the fats have melted fully the lye water and oils should be about 120F. A perfect temperature for mixing together our lye solution and fats.

Add the lye solution to the melted oils. You can pour the solution over the handle of your whisk or down the side of a rubber spatula to reduce air bubbles in your soap batter.

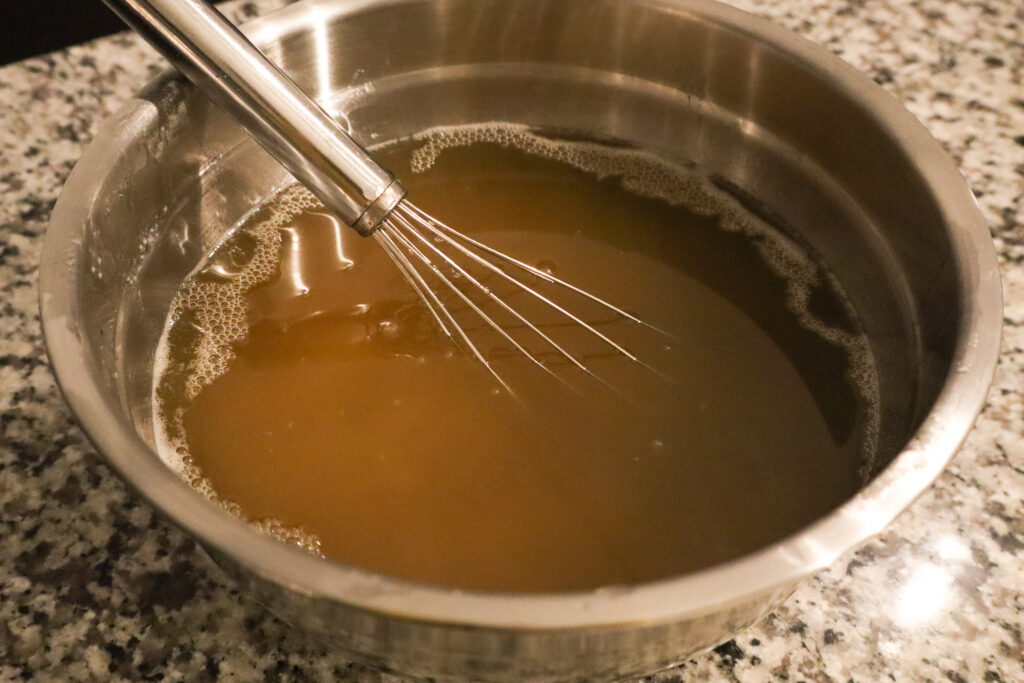
Whisk the mixture continuously for about one minute. You’ll notice it beginning to thicken almost immediately while you work on incorporating all of the fat into the lye solution. When it looks like pudding and you can leave a faint trail over the top, your batter is ready to mold.
At this point you could add any essential oils you’d like. Choose essential oils good for the skin and hair, such as rosemary, lavender, peppermint, tea tree, lemongrass or cedarwood. There’s certainly others, but double check the essential oils you’d like to use before mixing them into the soap batter.
At this point we are ready to mold our soap 😀

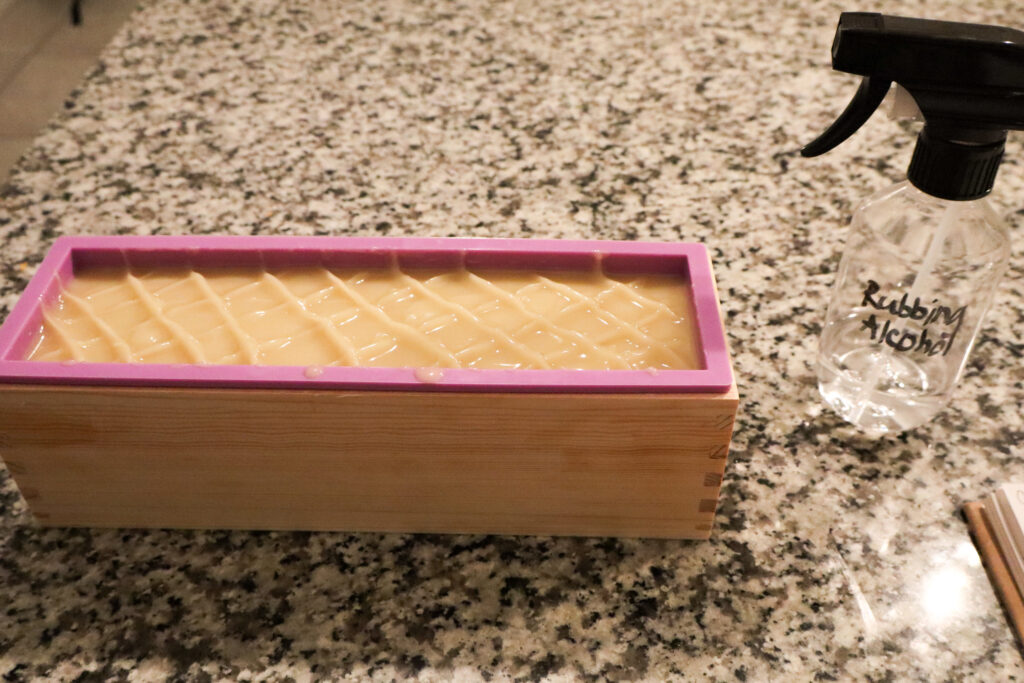
Gently pour the soap batter into your mold. Wiggle it around and bang it on the counter or floor to even out the mixture and remove any air bubbles. Once nice and settled you can go ahead and decorate the top. You can make a hill in the middle using a stainless steel spoon to shape the hill, or you can make a cross hatch pattern by dipping the tip of your spatula in diagonal lines across the top of your soap. Or, simply smooth it out for a flat top.
If you’d like you can spritz the top of the soap with rubbing alcohol to help prevent soda ash. Soda ash is a natural and safe substance that is produced when unsaponified lye reacts with carbon dioxide in the air. It’s harmless and can be wiped off after the saponification process is complete but it’s not very pretty.
Now that it’s molded you can wrap it in a towel or simply leave it uncovered and place it out of the way to saponify for the next 24 hours.
This soap will set up relatively quickly and can be unmolded 12-24 hours after molding. To cut your loaf into bars, use a sharp knife and cut about every inch or so. Don’t worry if it’s not perfectly straight, it’s still perfectly good soap to use.
Set your precious bars aside in a well ventilated area out of direct sunlight to cure for 4-6 weeks. Turn the bars every couple of days to ensure they dry evenly on all sides.

How to use shampoo bars
Lather up the soap in your hands and gently work that onto your scalp. You can also rub the bar directly on your scalp to add more soap where needed.
You will need to work a little harder to get the soap lathered up and cover your scalp fully compared to using liquid shampoo, especially if you have hard water.
Focus your effort at the roots, allowing the suds to rinse through to your ends instead of directly applying soap at the ends of your hair.
Once you have washed your hair, it can be beneficial to follow with an acidic rinse. You can use apple cider vinegar diluted in water, or even citric acid in water. This helps rinse out any soap scum and balance your hairs natural pH.
Your hair will go through a transition phase while it adjusts to the shampoo bar. The acidic rinse will really help you manage your hair while going through this phase. When I first tried shampoo bars, I couldn’t get a hair brush through my hair it was such a rats nest. But once I finally decided to throw some apple cider vinegar on my hair it returned to a soft and shiny state.
If you have a sensitive sniffer, or are married to someone who does, diluting a tablespoon of citric acid in 1-2 cups of water works just as well as the ACV and doesn’t leave any odor behind. For the ACV about 1/4 cup in 1-2 cups of water will do the trick.
After a month or so you may not need to follow with the acidic rinse every time you wash your hair. Be patient and over time your hair will adjust and be healthier for it 😀
If you give these shea butter and tallow shampoo bars a try, let me know what you think in the comments below! I’d love to hear how they work for you 😀
***This recipe has been edited to increase the super fat. Both the original and current recipe are great nourishing products for your hair.

Shea Butter & Tallow Shampoo Bars
Ingredients
Equipment
Method
- Before beginning, ensure that all distractions are put away. Kids are in bed or being looked after by another adult, and pets are contained.
- Weigh out all ingredients in separate bowls, leaving the lye to weigh out last. Make sure you are wearing your protective gear when handling the lye!
- Combine oils into a stainless steel pot or bowl and set over low heat.
- Working in a well ventilated area, add lye to the water, never the other way around (snow falls on the lake). Mix thoroughly with a stainless steel spoon. You may want to wear a face mask or hold a rag over your mouth and nose to ensure you do not inhale any of the fumes. Once well mixed, set aside the lye solution in a safe space.
- Every few minutes gently mix the oils, breaking apart any large chunks until all the oils and fats have melted. The temperature should be close to 120F. At this point the lye solution and oils will be close in temperature. Double check to be sure, as long as the lye and oils are within ten degree's of each other go ahead to the next step.
- Slowly pour the lye solution into the oils. You can pour over the handle of the whisk or over a rubber spatula to prevent air bubbles in the soap batter. Whisk continuously for about 1 minute or until the oils and lye solution have fully emulsified and the batter starts to thicken. At this point you can add any essential oils you'll be using.
- Gently pour the soap batter into your mold. Wiggle around the mold and gently bang it on the counter or floor to release any air bubbles and smooth out the top. Decorate the top as desired and set aside the mold in a safe place. You can also wrap the mold to trap in the heat while it goes through saponification.
- After resting in the mold for about 24 hours, unmold the soap. Using a sharp knife cut into 1 inch wide bars. Each should weigh about 4-5oz. Set aside in a well ventilated area to cure for 4-6 weeks. Turning every couple days to allow the bars to dry evenly.
This sounds lovely and not terribly hard to learn. I think I’ll give it a try, thanks for sharing!
I never knew about the acidic rinse! I actually quit using some products because of the film. Thanks so much!
What an interesting recipe! I love using tallow for cooking and skincare, can’t wait to try it on my hair 🙂 Thanks for sharing
Can’t wait to try this recipe! I made a similar one for soap bars. Could this be used for body and hair?
Yes, you can definitely use this as a shampoo and body soap. It may be a bit drying on your skin depending on your skin type.